Imagine you came to work today, and you notice there are brown spots in the ceiling. You think, “Oh great, another problem to add to my list…hopefully it’s just a minor leak and nothing else will happen.”
Then a month later, the brown spot gives and water is entering your building.
Now the search for a roofing contractor begins. You may also be thinking, “How old is the roof? I hope I can get away with a repair and not have to replace everything?”
A roofing contractor shows up and gives you great news.
They say you can get your roof watertight, can get you a new 10-15-20-year warranty, and have all the little cracks and holes in your roof covered up with a fluid-applied roofing system.
Fluid-applied? Really?
A roofing contractor begins to explain how an existing roof can be restored with a fluid-applied silicone roof coating. They also explain that the system is roughly half the cost of a full roof replacement.
This is because you only need to remove areas of the roof that are saturated with water, instead of the entire roof. We’ll get into the details later in this article.
West Roofing Systems has been a commercial roofing contractor since 1979. One of the newest roofing systems today are what’s called “a coating system”, “silicone roof coatings”, “silicone restoration membranes”, or many other names.
In this article, we’re going to explain:
- What a silicone roof coating system is?
- How a silicone roof system costs about half of a full roof replacement? And why?
- How a silicone coating system is installed?
- How the process of a coating system begins?
Let’s begin.
What is a silicone roof coating system?
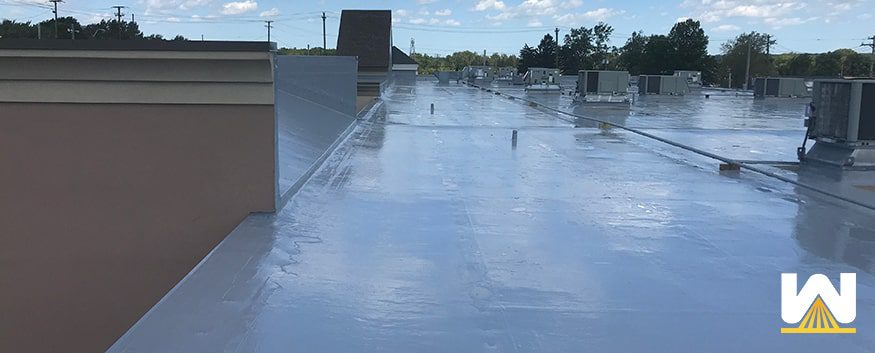
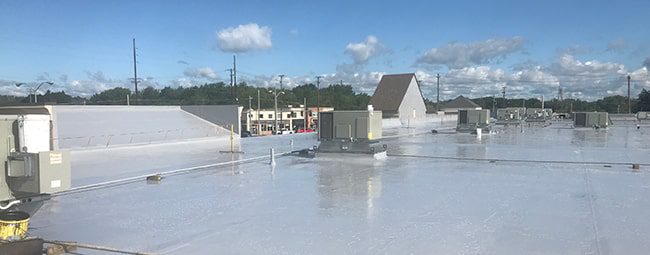
A silicone roof coating system is a single layer (applied in one or two coats) of silicone that’s rolled or sprayed on as a liquid to fill in cracks, small voids, seal seams, and to repair blisters.
It’s applied to an existing roof with the main benefit of getting a seamless, reflective surface that requires the least amount of tear-off possible.
Only the areas that are saturated with water require removal. These areas are recognized through core samples and/or infrared inspections.
How a silicone roof system costs about half of a full roof replacement?
The #1 way a silicone roof coating system saves money for a building owner is that you don’t have to remove the entire roof.
Only the saturated areas are removed and replaced, which is usually less than 25% of the roof.
If you did choose to do a complete roof replacement, the contractor will remove 100% of your existing roof.
Full roof removal takes more time, more labor, more material, and you’ll need to transport all your existing materials to a landfill.
Here are the estimated costs per square foot of popular commercial roofing systems:
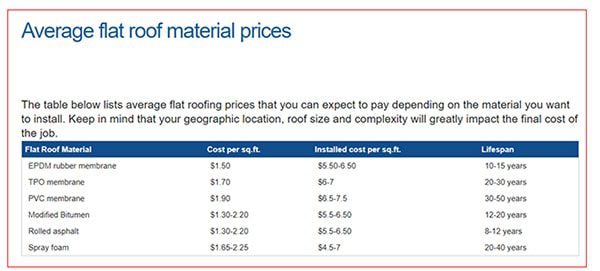
Source: https://www.roofcalc.org/flat-roof-calculator/
The average cost of a silicone roof coating system is $4 – $6 per square foot. The cost is influenced by how much of the roof needs to be removed and replaced, the length of warranty desired, and a few other factors.
How is a silicone roof coating system installed?
Here are the steps a contractor will take to install a coating system.
Step #1 – Find saturated areas
The first step is to identify where the current roof has allowed water to enter the insulation. This is done by inspecting the roof and by performing an infrared inspection.
Once these areas are identified, they will be removed and replaced with similar material.
For example, if iso-board was there before, new, dry iso-board will be installed.
NOTE: removing only the saturated areas is what separates silicone roof coating systems against complete roof replacements. Why remove areas of the roof that are still performing well? Minimizing roof removal is good for the environment and cost-effective for the building owner.
Step #2 – Prepare the roof
Now that the roof’s insulation is dry, we can focus on the top layer. The next step is to clean the roof. This is typically done through power washing.
Then a roofing contractor will need to determine if a primer will be needed. (This is determined by performing an adhesion test.) Some roof systems are made up of chemicals that will bleed through the lighter colored silicone. The primer also prevents this from happening.
Next, a contractor will perform adhesion tests to make sure the coating performs as it should on the roof. There are many types of silicones produced by many different manufacturers. The contractor wants to choose the best coating for that particular roof.
Step #3 – Treat the seams
Now that the right coating has been chosen, and we know through adhesion tests that the coating will perform to its highest ability, there needs to be special treatment to the seams of the roof.
Seams are reinforced in two ways:
1. Polyester Mesh with Coating
A contractor will install a polyester reinforced mesh into a liquid base coating and then an additional application of silicone coating after the base coat has cured.
2. Self-Adhesive Tape
A contractor can reinforce the seams, flashings, and penetrations with a self-adhering, reinforcing tape that would then receive a liquid topcoat.
Step #4 – Apply coating
With the seams treated, the last step is to install coating over the rest of the roof.
For a 10-year warranty, 20 mils of coating are usually installed.
For a 15-year warranty, 25 mils of coating are usually installed.
And in some cases, for a 20-year warranty, 30 mils of coating are usually installed.
The last step is for a manufacturer to perform an inspection on the roof to make sure all the seams and penetrations have been treated and that the proper millage of coating has been installed.
Everyone signs off on the warranty and the job is complete.
How do you get started with a silicone roof?
The first step is to request a quote and have a discussion with a commercial roofing professional.
After your discussion, a contractor will then set up a time to walk your roof with you and give you more information about the eligibility of your roof.
The contractor will determine eligibility by looking at the health of the seams, pulling a few core samples, and in most cases, performing an infrared survey to see how much water is saturated in your insulation.
If your roof is in decent condition, meaning only 25% or less of the roof is saturated, then most likely a silicone roof coating system can be installed.
If your roof is more saturated, say 25% and up, it may be more cost-effective for you to do the complete roof replacement.
West Roofing Systems has been working with property owners to get their leaking roofs watertight with the most cost-effective solution. Sometimes the roof can be restored, sometimes it needs to be completely ripped off, and sometimes spot repairs can be made.
But the key is to understand why.
We’ll provide you photos, infrared inspection surveys, core samples, and other forms of evidence to back up our suggestions.
Then you can compare our recommendations against other contractors so you have an apples to apples comparison.
If you’d like to learn more about silicone roof coating systems, please view: Your Complete Guide to Silicone Roof Coatings.
[there is no information required to read the entire document]